
Anúncios
You step into the shower wanting to simply relax after a brutally exhausting day at work. The water heats up, that nice steam rises. But then you look up at the ceiling, or worse, down at the corner of the tile grout, and there they are:
Anúncios
those disgusting little black mold spots that seem to multiply every single time you blink. And let’s be real? It hits you with a wave of embarrassment when guests come over and ask to use the bathroom, right?
Super frustrating. And the worst part is that you’ve probably already spent a small fortune at the grocery store on heavy-duty cleaning supplies. You know the ones. Those toxic bottles that promise miracles on the label but in reality only deliver a massive headache and an unbearable burning sensation in your eyes. Honestly? The best way out has always been hiding right there in your pantry.
Anúncios
Today, I’m going to give you my absolute ultimate homemade recipe to remove bathroom mold. And it actually works. Without you having to scrub the wall until your arm begs for mercy.
Why ditching bleach completely changes the game?
You know that strong chemical smell that leaves you feeling a bit dizzy when you’re cleaning with the bathroom door closed? Yeah. I can’t stand it anymore, and your lungs definitely shouldn’t have to deal with that toxic cloud every weekend. The huge advantage of mixing your own stuff isn’t just the absurd amount of money you save at the end of the month, but the pure intelligence behind the basic chemistry.
Bleach and harsh chemicals, most of the time, just bleach the fungus 🤯. It’s a really expensive optical illusion. They take away the black stain, you think you’ve cleaned it all up, but the nasty root is still right there, alive and kicking. The result is painfully obvious: the grime comes right back the following week. When we use the right stuff from our own kitchen, we attack the porosity of the grout and kill the fungus straight at the source. The tables turn entirely in your favor.
The Best Detailed Options (Our Arsenal)
To keep you from getting totally lost, mixing everything you see and accidentally creating a homemade smoke bomb, let’s break down the three “heroes” of our smart cleaning routine.
Plain White Vinegar
- The “Vibe” of the Ingredient: This is the absolute best friend of anyone who wants brute force and practicality. Forget fancy apple cider or red wine vinegars; we’re talking about the dirt-cheap, transparent stuff that smells strong.
- What it actually does: It literally penetrates deep into the pores of your grout or ceiling plaster and suffocates the mold from the inside out. It doesn’t mask the black dirt, it annihilates the colony.
- The Catch (Differential): White vinegar has an exact acidity level (usually between 4% and 5%) that roughly 82% of mold species simply cannot survive. It creates a completely hostile environment for them.
- Honest Opinion: I’ll be 100% straight with you, the smell is intense when you first spray it. Does your whole bathroom smell like a sad, sour salad for a bit? Yep. But it evaporates in a couple of hours if you leave the window open, and unlike corrosive industrial products, it won’t leave you gasping for air.
Baking Soda
- The “Vibe” of the Ingredient: Remember that stubborn grime that has basically turned into a rock in the corner of your glass shower door? Baking soda does the heavy lifting for our duo.
- What it actually does: It creates a very gentle abrasion. Think about it: you know when you need to scrub hard, but you’re terrified of scratching your brand-new ceramic tiles? This acts as a microscopic, super-safe sandpaper.
- The Catch (Differential): It has the amazing power to absorb the residual moisture that attracts mold in the first place. Meaning, it cleans and preps the terrain to prevent the grime from ever coming back.
- Honest Opinion: The absolute worst thing you can do in life is mix it directly with vinegar inside a bucket thinking it will boost the power. They chemically cancel each other out and just turn into salty water with useless fizz! The secret is to use it as a separate paste. It’s a tiny bit more annoying to prep, but the shine it leaves on the tile is worth every second of your effort.
Tea Tree Essential Oil
- The “Vibe” of the Ingredient: This is the “premium” touch of the chore. For those who want a bathroom that smells like a luxury spa, but packing a scary-strong antifungal punch.
- What it actually does: Tea tree is a remarkably powerful natural fungicide. A few drops penetrate the grout and create an invisible protective barrier that lasts for weeks.
- The Catch (Differential): Unlike vinegar, it leaves behind a delicious, minty-woodsy scent. Your bathroom won’t just smell clean; it will smell like an expensive nature retreat.
- Honest Opinion: It is a slightly pricier ingredient, I won’t lie. But a tiny 10ml bottle lasts practically the whole year, since you only use about 5 to 10 drops per cleaning session. It’s an investment that pays off incredibly fast.
See Also
- Under Pressure? 3 Apps to Track Your Blood Pressure
- How to Clean Yellowed Pillows: Magic DIY Recipes
- How to Remove Calluses with Home Remedies
- How to Clean Mattress Stains: A Magic DIY Recipe
- Turn Your Phone Into a Metal Detector
How to start without a headache
Get a load of how the magic happens. There’s zero mystery here, but the exact order you do things matters immensely for it to work. Let’s go through the killer recipe step-by-step, just like I was standing right there guiding you:
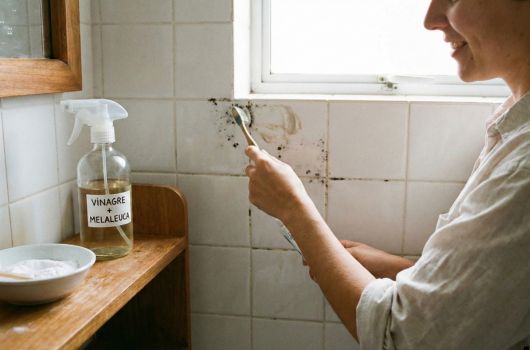
- Pour the pure white vinegar into a clean spray bottle. No diluting it with water, we need it at full strength. If you want, drop about 10 drops of tea tree oil in there right now.
- Spray generously over all the black spots. Soak it. Don’t be stingy.
- Now go grab a strong cup of coffee or watch a quick episode of your favorite show. Seriously, let the vinegar sit and do its thing for at least an hour. Time is doing the hard work here, not your muscles.
- In a separate little bowl, put two heaping tablespoons of baking soda and just a few drops of water. Mix it until it turns into a thick paste (think toothpaste consistency).
- Grab an old toothbrush that was destined for the trash, dip it generously into that paste, and lightly scrub only the really stubborn spots that didn’t vanish with just the power of the vinegar.
- Rinse everything down with warm water straight from the showerhead. End of story.
Which combo is your perfect match?
If your bathroom only has a few light spots starting to peek through the grout, just go with the pure vinegar in the spray bottle. It works like a charm, it’s super fast, and you don’t even have to get your hands dirty. Now, if your ceiling looks like a scene from a horror movie or the grime is super thick in the corner of the shower floor, our dynamic duo (spraying vinegar first, letting it sit, and following up with the baking soda paste) is your one and only true salvation.
So, are you going to test this recipe out today before taking that hot shower? Your tile grout—and your nose—will thank you. 😉
Express Shopping List
- Plain White Vinegar – (At any corner grocery store)
- Baking Soda – (In the baking aisle or nearest pharmacy)
- Tea Tree Oil – (Optional, usually found in natural health stores)
- A spray bottle and an old toothbrush – (Or your ex’s toothbrush, totally up to you)