
Anúncios
You saw the ad showing that dark, grimy line turning bright white in seconds. And you clicked because, let’s be real, nobody wants to spend their weekend scrubbing the floor. You are probably tired of sitting on your hands and knees with zero results.
Links internos do site.
Anúncios
Finding a reliable homemade grout cleaner doesn’t have to be a frustrating science experiment. We completely get it. You just want your bathroom or kitchen looking fresh again. You want to skip the toxic fumes burning your eyes.
This guide delivers exactly what brought you here today. We tested the most popular DIY cleaning recipes so you do not have to guess. We will show you exactly what to mix and how long to wait.
Anúncios
You will learn what actually removes that stubborn, embarrassing dirt. Let’s get your floors looking brand new right now. We are using stuff you probably already have sitting in your pantry.
The best homemade grout cleaner recipes: our honest selection
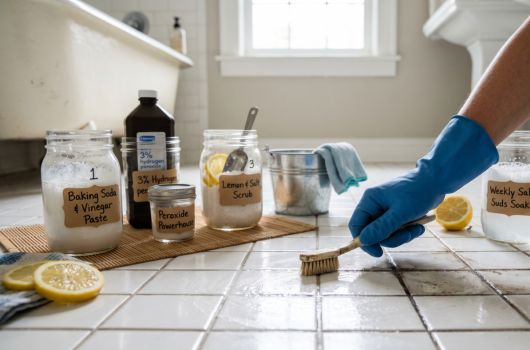
The Baking Soda & Vinegar Classic
The vibe: For those who want quick action using basic kitchen items. This is the absolute classic DIY method everyone tries first.
What it does in practice: It bubbles up immediately upon contact. This fizzy reaction actively breaks down loose surface dirt. You literally see the grime lifting away from the tight cracks. It softens the gunk so you do not have to scrub hard.
The pulo do gato (the catch): You absolutely have to let it sit. The bubbling looks very cool, but the real magic happens ten minutes later. The paste needs actual time to absorb the deep stains.
Our honest opinion: As a homemade grout cleaner, this is the easiest entry point. But honestly, it gets a little messy. You will need a wet rag to wipe up the gritty leftover paste. It takes a bit of extra rinsing to avoid white streaks. Still, for regular weekly maintenance, it is completely unbeatable.
The Hydrogen Peroxide Powerhouse
The vibe: For heavily stained, seriously neglected bathroom tiles. If you haven’t cleaned them properly in a year, start right here.
What it does in practice: Hydrogen peroxide is a powerful natural whitening agent. It attacks dark mold and mildew spores directly at the source. It noticeably brightens the lines without degrading the actual cement over time.
The pulo do gato (the catch): You need to use standard 3% hydrogen peroxide. Anything stronger might accidentally damage your floor tiles. Also, adding a tiny drop of dish soap makes the liquid stick better to vertical walls.
Our honest opinion: This is our absolute favorite recipe for really tough jobs. The smell is practically zero. It works way faster and better than vinegar. The only downside is that peroxide degrades quickly in sunlight. You must mix a fresh batch every single time you clean.
The Dish Soap & Lemon Paste
The vibe: For small, stubborn spots and sticky grease stains in the kitchen. It is absolutely perfect for the stove backsplash.
What it does in practice: The natural citric acid cuts right through cooking grease. The coarse salt acts just like heavy sandpaper. Together, they scrub away sticky kitchen residue with very little effort.
The pulo do gato (the catch): Lemon juice is highly acidic. You should never, ever use this on natural stone tiles like marble. It will permanently ruin the expensive finish.
Our honest opinion: We really love the fresh, natural smell it leaves behind. It feels very rewarding to use after cooking a big meal. But rubbing the salt does require some elbow grease. It is definitely a mini arm workout. Save this specific recipe for isolated, tricky spots near the stove.
The Hot Water & Sal Suds Soak
The vibe: For easy weekly maintenance when things aren’t too bad yet. It keeps the heavy, dark grime away effortlessly.
What it does in practice: It lifts light dirt without leaving any sticky, soapy residue behind. It is completely safe for almost every single type of floor material.
The pulo do gato (the catch): You have to use really hot water. Cold water simply won’t activate the soap properly to cut the dirt.
Our honest opinion: It is incredibly gentle and totally foolproof. You won’t get dramatic, blindingly white results here. But if you do this weekly, you won’t ever need the heavy-duty pastes. It is all about working smarter, not harder on cleaning day.
Common mistakes when using a homemade grout cleaner
People often give up on DIY cleaning way too quickly. Usually, they are just making a few very basic errors. Let’s fix that right now so you don’t waste time.
First, you cannot rush the waiting time. This is the biggest mistake we see online. When you apply a homemade grout cleaner, it needs time to penetrate. If you scrub immediately, you are just moving wet dirt around. Give it at least 15 minutes. Go grab a cup of coffee and relax.
Second, using the wrong brush ruins the entire effort. Soft sponges are totally useless here. They just wipe the flat tile surface. You need stiff bristles that can reach deeply into the crevices. An old toothbrush is your best friend. Even better, buy a specific stiff brush. It makes the job twice as fast.
Third, mixing ingredients directly in a spray bottle often fails. The fizzing reaction is cool, but it neutralizes very quickly. You usually end up spraying basically salty water. Always mix them directly on the floor. Or make a thick paste first and use it immediately.
Finally, forgetting to rinse properly leaves a very cloudy film. Baking soda leaves a chalky residue when it finally dries. You have to wipe the area thoroughly with a clean, wet cloth. Then mop the whole floor. If you skip this, your tiles will look dull tomorrow.
See Also
- Best Homemade Poison to Kill Cockroaches Fast
- Best Homemade Recipes for Cellulite
- Best apps to see who viewed your instagram profile today
- The Best Blood Pressure Monitor Apps Anyone Can Use
- Metal Detector App: How to Turn Your Phone Into One
How to start without complication
- First, sweep or vacuum the entire floor area completely. You do not want to scrub loose dirt into the porous lines.
- Pick your chosen homemade grout cleaner recipe from our list above. Mix it in a small, clean glass bowl.
- Grab a narrow, stiff-bristled brush. An old toothbrush works perfectly for this specific job.
- Apply your paste directly onto the dark lines. Make sure it covers the dirty areas completely and thickly.
- Step away for at least 10 to 15 minutes. Let the natural ingredients actually do the hard work for you.
- Come back and scrub the lines gently. You shouldn’t need to push down too hard if the paste worked.
- Wipe away the dirty, gritty paste with a warm, damp microfiber cloth.
- Do a final mop with plain hot water to remove any lingering residue.
If you want a simple, everyday refresh, the vinegar mix is the way to go. If you are dealing with serious bathroom mold and dark stains, the hydrogen peroxide powerhouse delivers much better results. Now, if you just need to cut through sticky cooking grease, the lemon and salt scrub wins easily. The real secret is matching the right recipe to your specific mess. So, which one of these homemade grout cleaner recipes are you going to mix up first today?